

Installing a lintel or Opening a wall to fit a door or window can be a very dangerous job, if you are not 100% certain what you are doing it is best to employ a builder to do it for you. Before opening the wall you are advised to seek advice from a structural surveyor.
Most load bearing walls are made from brick or block but do not assume if a wall is made from a wood frame and plasterboard that it is non load bearing as modern houses often have timber load bearing walls!
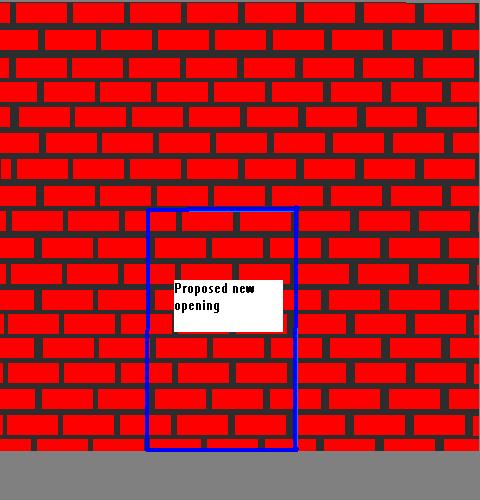
You will need to install a lintel to take the weight of the wall above before removing the bricks for the opening, this is relatively straight forwards. First decide exactly where the opening is to be, make sure you have permission from the local building inspector before continuing.
You are going to require some steel props (acrows) and either some lengths of 6 inch by 2 inch timber no longer than 9 feet long (known as needles) or some strong boy type attachments for the props. I prefer strong boy attachments as you need half as many props and you do not need to make large holes for the needles as the strong boy attachments are only 10mm thick and normally will fit between courses of brick by simply removing the mortar. We are going to be using strong boy attachments here for ease. Check the floor is strong enough to take the weight that will be placed on the props once they are inserted into the wall, if the floor is concrete it will probably be ok but if it is wood you will have to check that it can take the weight, if the floor is uncertain it is advisable to remove floor boards and check the joists and establish a stronger support. If the floor is solid or wood, you will still need to use a plank underneath the props to distribute the weight.
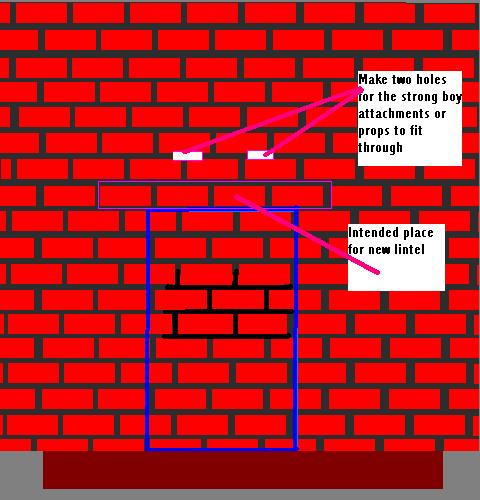
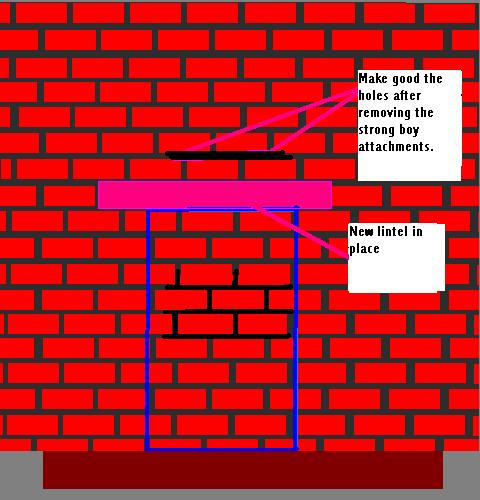
Holes must be carefully made through the walls for the strong boy attachments or the needles, As we are using strong boy attachments it is simply a case of deciding where the holes need to be, in this case we are simply going to remove the mortar from between the joints using a power drill and masonry bit, simply drill enough mortar away until you can get the prop attachments through the holes, if they will not fit it will be necessary to remove a brick from below. Needles or strong boy attachments should be no further apart than 900mm centres (3 feet), 600mm centres are preferred (2 feet). The plank at the base spreads the load evenly.
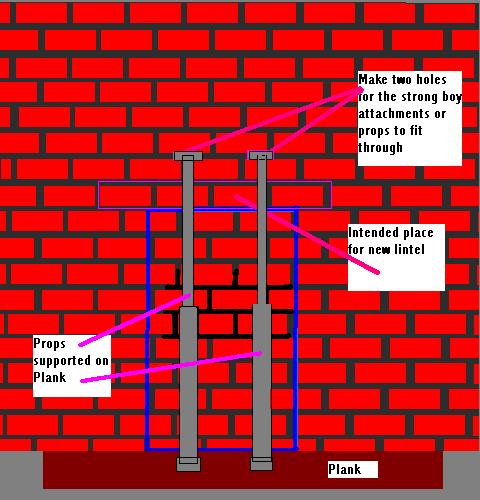
Install the two prop attachments or needles through the holes and tighten the screw handle to take the weight of the wall. You will now see why I prefer strong boy type attachments as you only need them on one side of the wall, hopefully this will be the opposite side than what you are working on making moving far easier. If needles were used you need twice as many props, twice as many planks and the needles themselves. You can purchase strong boy type attachments or you can hire them from your local hire shop.
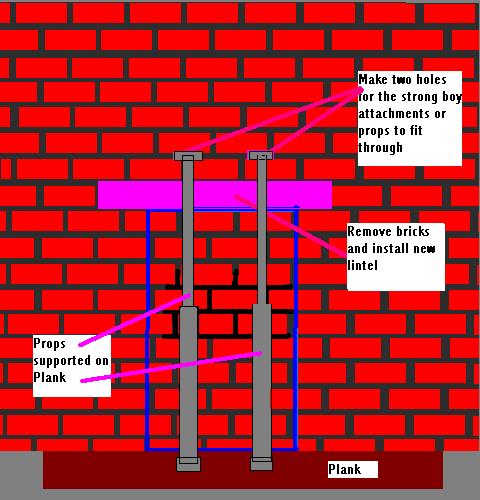
- When the props are secure you can carefully remove the bricks which need removing for the lintel, there are several ways in which you can do this-
1. using a 9 inch angle grinder and diamond tipped disk cut away the mortar which surrounds the bricks, this will create lots of dust and can only really be done in the early stages of a complete refurbishment project.
2. Using a masonry bit and power drill, remove all the mortar from between the joints by drilling it away and moving the drill from side to side.
3. remove the bricks using a bolster chisel and heavy hammer. After removing the bricks you can install the new lintel, if you have any doubts about the strength of the masonry it is a good idea to use engineering bricks for the bearing points. The new lintel must project at least 6 inches beyond the intended opening! Reinforced concrete lintels are normally used for internal openings, It might be necessary to remove a further course of bricks below where the lintel is to be positioned to enable the new lintel to be positioned correctly. A bed of mortar should be applied to the top of the lintel and a bed of mortar should be placed onto the bearing points, you can now position the lintel, ensure it is Level. Wait at least 24 hours before proceeding.
When the Lintel is in place and the mortar has hardened fully you can remove the supporting props and fill the holes where the strong boy attachments have been with mortar. You should now proceed with caution and remove the bricks from below the lintel. Personally I don't like hammering at walls as it loosens masonry and cracks plaster, the last time I opened a wall I used a 9 inch angle grinder and diamond tipped blade and simply cut the whole opening away, obviously you cannot always do this especially if it is your home so it is best to remove each individual brick with a chisel and heavy club hammer, safety goggles, steel toe cap footwear and gloves are essential.
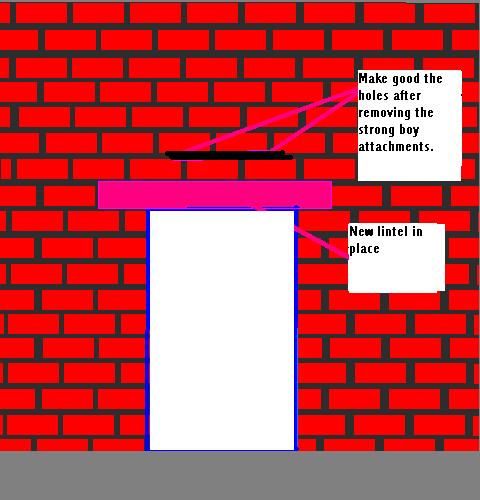
Remove the bricks by starting at the top and if any bricks need cutting do it with the chisel from above whilst the brick is still supported from below by the other bricks. You now have your opening in the wall and the lintel firmly in place
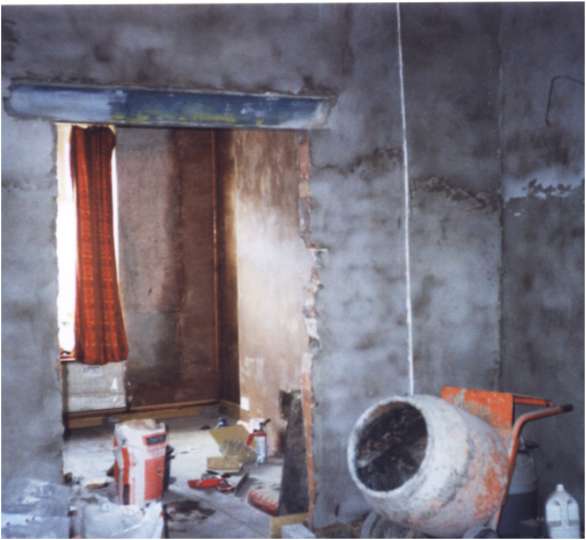
This is an example of an installed lintel