

Leave it on! Well, at least for the time being, it offers some security whilst you mess about with other things and you can still store your building materials in the garage…
Consider the brickwork either side of the door that the frame is fixed to, it’s usually only 9” wide and sometimes the brick courses either side are not level with each other. In the case of an extension type garage built on the side of the house this is highly likely.
The first thing the building inspector will want to know is if a footing exists under the door. In an extension type garage this is highly unlikely. The building inspector may make you dig a test hole alongside if you’re in disagreement.
So, lets assume the worst, the courses don’t line up and there’s no footing. The first thing to do is dig the footing. (leaving the garage door on also gives you shelter from the rain if you open it whilst you’re digging). Consider the finish once its all bricked up, its perfectly possible to cut a straight line in line with the outside edge of the face brick with a disc cutter and under dig to achieve the footing width. The footing will need to be around 600mm wide (300mm either side of centre line – cavity wall situation).
Dig down keeping tight up to the brickwork in a nice straight line until you find the existing house footing, it should protrude slightly from the brick piers. Once you’ve found it keep going till you find the bottom of the footing concrete. You should be in nice hard clay or sand. If what you’re now digging isn’t nice and solid e.g. full of old ash, marbles, other detritus you’ll need to keep digging until you get to a level where it is solid. Digging down a little further in this situation and blinding it back off with sand to fool the building inspector is a trick they’re wise to and you probably wont get away with. Some building inspectors have been known to jump down and dig a shovel full out just to make sure, especially in areas prone to being built on ash or similar.
It’s possible you may come across services like water, gas, electric or even soil waste / foul as your digging so be careful, it’s a popular route into the house, especially if the meters or stop cock are in or near to the garage. Dig carefully round them and they’ll either be concreted back in incorporating a sleeve (like a split bit of 110mm underground pipe) or bricked over incorporating a concrete lintel.
Now, you need the building inspector to check it before you pour any concrete. Ideally you should ring them the day before and book the inspection for around 11 o’clock (should easy have it dug by then). Once he’s been and given you the thumbs up you can pour your concrete footing back up to the depth of the top of the existing house footing (or 250mm if you’ve had to go down a bit further but work the level to a multiple of 75mm from a course of bricks). You’ll need around a half to a ton of ‘ballast’ and 5 bags of cement (you’ll use the rest of the cement on the brickwork). Easy concrete mix is 1 builders bucket of water in a mixer, ½ a bag of cement and then fill the mixer with ballast (around 15-17 shovels) – gives you around a 6:1 mix, nice and wet and easy to tamp level. A quick trick for the experienced diyer is to knock the concrete up real dry (like screed almost) once the building inspectors gone, level it and then you can build straight off it same day (it’ll set itself with the moisture from the ground).
Now you can remove the garage door!
Be a little bit careful, spend a little time figuring it out, there are a few different types and blindly removing screws and bolts may leave you with a black eye or worse as some pretensioned sprung loaded bit of runner catches you square on as you release the screws – you have been warned!
Don’t just ‘lump hammer’ the frame out, put a saw cut through the centre and lever it out from the inside with a crowbar or you’ll destroy the brickwork.
Bricking up the gap should be a relatively simple task for an experienced person but the thing to remember is the courses either side of the gap may well be out of level. This rules out ‘toothing’ in to match up to the existing brickwork so the easiest way round it and still have it look reasonable is to set the face of the brick back from the existing an inch or so and use a proprietary starter tie up the edge of the piers. You can use concrete blocks if you like and render the panel in, this usually looks quite attractive, especially if done well in a ‘through coloured, scraped finish’ render such as ‘k – rend’. If by some miracle there’s no footing and the courses do line up nicely you can tooth the halves out, match the bricks and run them in. DON’T forget to include damp proof course.
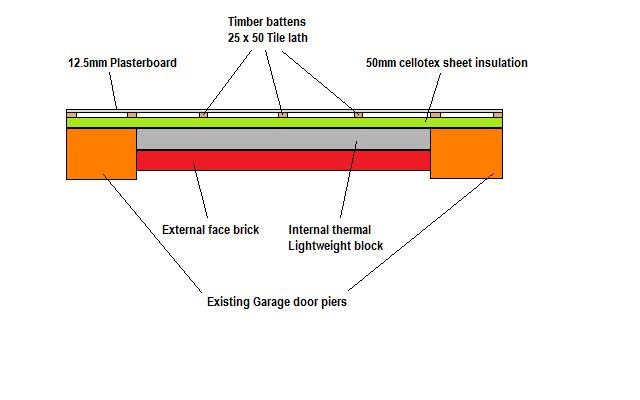
If you’ve set the face back 20mm or so you could build a solid wall 9” thick then insulate the whole back face in a straight line (see illustration).
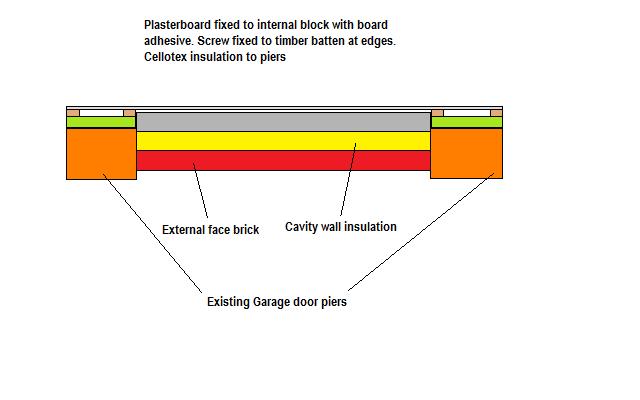
If you build a cavity wall this will usually set the back / inside face of the block work back beyond the brick pier, the further the better to be honest as the wall you’ve just built won’t require any insulation whereas the brickwork to the side will. Get it as near as you can so when you plasterboard the inside, the boards will run flat across the front of the cellotex you’re going to fix to the side brickwork.
You could also build a single skin wall and studwork the inside incorporating your insulation, this method would only require a footing of 450mm.
Yet another way is just to brick up to the DPC and built the entire wall from treated timber, insulate and include a vapour barrier, and clad the external in shiplap or similar, even plasterers lath and modern 1 coat render is an option externally on timber. Another option might be ‘hung’ rosemary roof tiles as found on a lot of gable ends or dormer windows. Even uPVC cladding is a viable and cheap alternative.
Or you could simply brick up to DPC and install a set of French doors with sidelights (screens). Remember a French door with each door leaf over about 900mm may give you problems later on (especially uPVC) so either install side screens or fit a sliding patio or Bi-fold door.
Whichever method you choose, run it by the building inspector and remember you’ll probably place a radiator underneath the window internally. This helps the radiator ‘convect’ and so works better but remember you’ll need to hang it on the wall so you’ll need a decent fixing. Also think about the depth of the window board, make sure you can get hold of a deep enough board. Standard window board being around 225-250mm. A 225mm window board with a 100mm cavity will be to narrow by the time you’ve bonded the plasterboard to the wall and skimmed it. The method of constructing the block internal wall tied to and tight up to the face brick will leave you with a distance of around 190mm using 50mm of sheet insulation so a 225mm window board would be perfect.
You will by now have the window on order or delivered so you’ll have made the decision as to the size and that decision will have been made on whether you want the window to run the full width of the opening (much easier and less work) or be a brick or 2 less than the full width. Brick up accordingly.
Bear in mind that if there is no current access into the space besides through the garage door that you’ll need to cut a hole out! Ideally before the window gets fitted. If you’re competent you can pour the footing, brick up and install the window all in the same day so it’s ideal to knock through straight after the pouring of the footing.
It’s also a good idea to put any ‘Stihl saw’ cuts in from the garage side as no one likes a houseful of dust (which is exactly what will happen if you fire it up on the other side of the wall!!)