

Immersion heaters can easily burn out or sometimes they become less efficient as they become covered with scale, when a heating element burns out it does so very quickly and will often stop working immediately, whereas scale build up will result in the heater taking longer to heat the water each time.
Indirect hot water cylinder
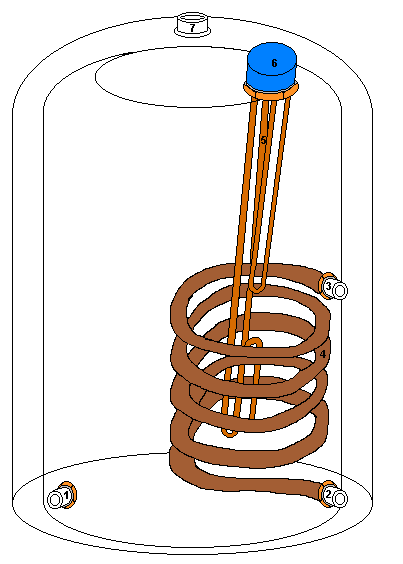
- 1. Cold water inlet from the cistern
- 2. Outlet pipe to the boiler
- 3. Inlet from boiler
- 4. Heating coil
- 5. Dual element immersion heater
- 6. Heater boss
- 7. Hot water outlet
If you suspect your immersion heater has stopped working use a non contact electrical tester and hold it near the wire as it enters the heater boss, if this shows that there is current there then the immersion heater needs replacing. In some cases the fuse protecting the circuit will blow. Ensure that the boiler that heats the cylinder is switched off and stop the water supply to the cylinder either by closing the gate valve on the feed pipe or by draining the cold water cistern. If you need to drain the cold water cistern you can either turn off the main stopcock entering the property off, or tie up the ball float using a piece of string and a length of wood to prevent the tank from re-filling. Open the hot taps in the bathroom and kitchen, this will drain out most of the water.
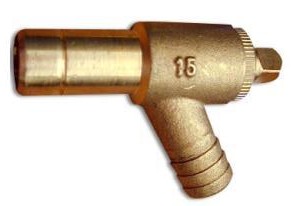
You now need to locate the Drain cock (left picture) this should be at the base of the feed pipe from the cistern, alternatively you may need to use the boiler drain cock. Attach a suitable hose pipe onto the end of the fitting and then undo the square by turning it anti-clockwise with either a drain cock key or pliers.
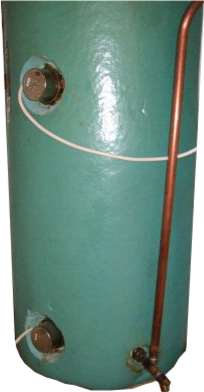
This cylinder on the left is the insulated type, it also has two Immersion heaters. Note the drain cock at the bottom of the picture! To remove an Immersion heater from a cylinder like this you will need an Immersion box wrench
Before attempting to change the immersion heater, you must isolate the electricity to it at the consumer unit and ensure that the supply cannot be restored whilst you are working on it! Please see the page on safe isolation procedure
There are normally only three wires that need disconnecting but take note of where they go before removing them, the Cable should also be heat resistant flex!

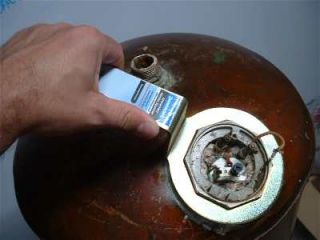
Spray some penetrating oil between the immersion heater nut and the cylinder, leave this as long as possible. You can see that this immersion heater is completely beyond repair as most of the electrical connections have been damaged.
Locate the Immersion heater spanner onto the nut and turn it anti-clockwise.
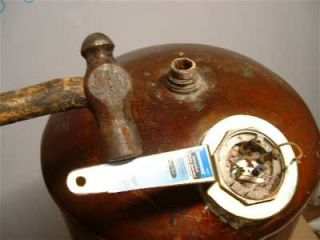
If you cannot move the spanner try hitting it with a hammer, to shock it, be sure to hold the other end of the spanner onto the nut to prevent it slipping off! Once the immersion heater is loose you can remove it from the cylinder. Now measure the length of the Immersion heater and obtain a suitable replacement
To refit the new immersion heater start by wrapping PTFE thread sealing tape anti-clockwise around the thread of the tail of the new immersion heater, Ensure that the sealing ring is in place (if there is one). Insert the immersion heater into the cylinder ensuring that if it is a indirect cylinder that the new immersion heater does not foul the heat exchanger. Ensure that the immersion heater is fully tightened and then ensure the drain cock has been closed and the taps that you opened earlier. Now restore the water and check for leaks, if the immersion heater is leaking tighten it further with the spanner. You can now reconnect the wires that you removed earlier, now you can set the thermostat by turning it with a small screwdriver, set this to the same figure as the old one that you removed. Ensure you fit the cover back onto the immersion heater before restoring the electrical power.