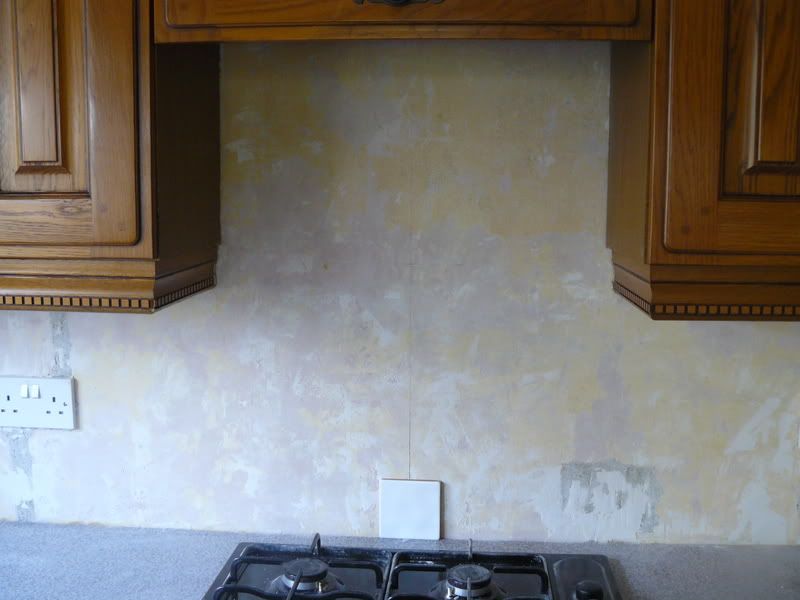
Is this where I should start?
Moderator: Moderators
-
- Senior Member
- Posts: 218
- Joined: Sun May 04, 2008 5:34 pm
- Has thanked: 6 times
- Been thanked: 9 times
Is this where I should start?
Forgive me, I have read the tutorials, which are very good. But just to make absolutely sure please tell me if this is the correct place for me to start tiling my cooker splashback:
The line on the wall (hopefully you can see it) is the centre of the units either side of the cooker hood, which isn't too far off centre of the walls. I've sat the tile where I think I should be starting. Is this correct? It isn't the style of tile I am going to be using but its the same size. Also I'm aware I should sit it on a spacer (I haven't in this picture) and have been led to believe 2mm spacers are what I should be using. Any advice appreciated. Thanks.
- ultimatehandyman
- Site Admin
- Posts: 24425
- Joined: Sat Jul 16, 2005 7:06 pm
- Location: Darwen, Lancashire
- Has thanked: 1012 times
- Been thanked: 918 times
That is where I would start, but I would also start ontop of a line of tile spacers, so that if you ever need to get the worktop out, you can do so without damaging the tiles. Then remove the spacers when the adhesive is set and then silicone the gap.
I'd also remove the pelmet from underneath the cupboards and then cut a little bit off before replacing.
- ultimatehandyman
- Site Admin
- Posts: 24425
- Joined: Sat Jul 16, 2005 7:06 pm
- Location: Darwen, Lancashire
- Has thanked: 1012 times
- Been thanked: 918 times
- ultimatehandyman
- Site Admin
- Posts: 24425
- Joined: Sat Jul 16, 2005 7:06 pm
- Location: Darwen, Lancashire
- Has thanked: 1012 times
- Been thanked: 918 times
- ultimatehandyman
- Site Admin
- Posts: 24425
- Joined: Sat Jul 16, 2005 7:06 pm
- Location: Darwen, Lancashire
- Has thanked: 1012 times
- Been thanked: 918 times
- skiking
- Senior Member
- Posts: 3842
- Joined: Wed Sep 13, 2006 9:02 pm
- Location: Cheshire
- Has thanked: 0
- Been thanked: 4 times
As much as it easy on the eye to centralise the tile you also need to take into account the end of the run and make sure you are not left with a slither of a tile.
I normally get a length of wood and mark off the tile and a spacer and measure up against the end of runs, plug sockets, wall units, windows etc
- ultimatehandyman
- Site Admin
- Posts: 24425
- Joined: Sat Jul 16, 2005 7:06 pm
- Location: Darwen, Lancashire
- Has thanked: 1012 times
- Been thanked: 918 times
- ultimatehandyman
- Site Admin
- Posts: 24425
- Joined: Sat Jul 16, 2005 7:06 pm
- Location: Darwen, Lancashire
- Has thanked: 1012 times
- Been thanked: 918 times
- ultimatehandyman
- Site Admin
- Posts: 24425
- Joined: Sat Jul 16, 2005 7:06 pm
- Location: Darwen, Lancashire
- Has thanked: 1012 times
- Been thanked: 918 times