Page 1 of 2
Is this where I should start?
Posted: Mon May 12, 2008 8:14 pm
by blakes
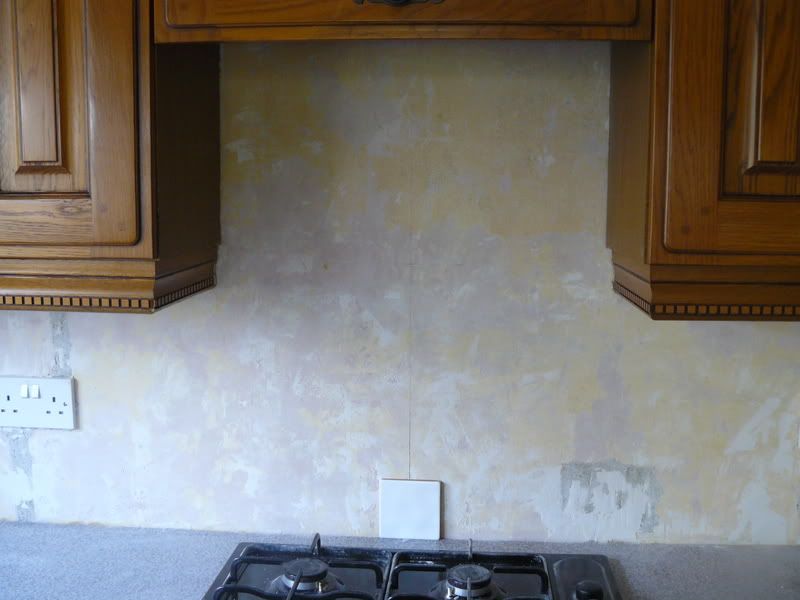
Forgive me, I have read the tutorials, which are very good. But just to make absolutely sure please tell me if this is the correct place for me to start tiling my cooker splashback:

The line on the wall (hopefully you can see it) is the centre of the units either side of the cooker hood, which isn't too far off centre of the walls. I've sat the tile where I think I should be starting. Is this correct? It isn't the style of tile I am going to be using but its the same size. Also I'm aware I should sit it on a spacer (I haven't in this picture) and have been led to believe 2mm spacers are what I should be using. Any advice appreciated. Thanks.
Posted: Mon May 12, 2008 8:19 pm
by ultimatehandyman
That is where I would start, but I would also start ontop of a line of tile spacers, so that if you ever need to get the worktop out, you can do so without damaging the tiles. Then remove the spacers when the adhesive is set and then silicone the gap.
I'd also remove the pelmet from underneath the cupboards and then cut a little bit off before replacing.
Posted: Mon May 12, 2008 8:20 pm
by ultimatehandyman
Ooops just read the bit about the spacers

You look like you have it sussed

Posted: Mon May 12, 2008 8:26 pm
by blakes
Thanks. So the bottom row sat on the spacers - once the adhesive has set would you grout between them and the worktop then silicone or JUST silicone? Also, would you recommend I use 2mm spacers? Thanks
Posted: Mon May 12, 2008 8:28 pm
by ultimatehandyman
Just silicone.
I'd use 2mm spacers, but that is just my personal preference. Just use the ones that look best with the size of tile and colour of grout

Posted: Mon May 12, 2008 8:34 pm
by blakes
Ok thanks for that UHM. I will no doubt have some more questions at some point but I will post back with progress and pics when I get done.
Posted: Mon May 12, 2008 9:07 pm
by ultimatehandyman
Good luck with it

Splashbacks are normally fairly easy!
Can't wait to see the pictures

Posted: Mon May 12, 2008 9:22 pm
by Only-Me
ultimatehandyman wrote:Good luck with it
 Splashbacks are normally fairly easy!
Can't wait to see the pictures

But a pain in the arse.

Posted: Mon May 12, 2008 9:29 pm
by skiking
As much as it easy on the eye to centralise the tile you also need to take into account the end of the run and make sure you are not left with a slither of a tile.
I normally get a length of wood and mark off the tile and a spacer and measure up against the end of runs, plug sockets, wall units, windows etc
Posted: Mon May 12, 2008 9:38 pm
by ultimatehandyman
It should be ok where he has started

Posted: Mon May 12, 2008 9:43 pm
by skiking
what about the socket to the left

- you don't want to be leaving yourself an 'orrible cut

Posted: Mon May 12, 2008 9:46 pm
by ultimatehandyman
The bit between the units is the important bit

Sockets are a piece of cake as you can make the tiles bigger and hide them behind the socket.
If you try and arrange the tiles to avoid nasty cuts it could take a very long time to tile

Posted: Mon May 12, 2008 9:50 pm
by skiking
you plan it on a spreadsheet

.....now that is

Posted: Mon May 12, 2008 9:55 pm
by ultimatehandyman
skiking wrote:you plan it on a spreadsheet

.....now that is

I remember somebody doing that

Posted: Mon May 12, 2008 10:08 pm
by blakes
ultimatehandyman wrote:It should be ok where he has started

Ha ha! Keep going - you'll have it done in no time!

